Purpose:
Section titled “Purpose:”Purpose is to outline the process for upgrading Cisco ASAv
Scope:
Section titled “Scope:”Project Team, Cloud, vITM, and Service Desk
Responsibility:
Section titled “Responsibility:”Project Team, Cloud, vITM, and Service Desk
Completion Criteria:
Section titled “Completion Criteria:”Complete and correct is determined by a successful firmware update of the Cisco ASA, with all functionality restored and tested. This includes testing ASDM, internet access, remote access VPN login, IPSEC vpn tunnels established, and n-central monitoring alerts cleared for the device.
Records:
Section titled “Records:”Output records are the running configuration files prechange and postchange, as well as evidences of testing. They are stored in the Request for Change ticket.
Steps:
Section titled “Steps:”Pre-Change Steps:
-
Set company in Downtime in N-central for 2 hours.
-
Write mem and output running configuration to .txt file
-
Copy running config to backup
copy running-config flash:/backupconfiguration -
Identify what IPSEC tunnels are active prior to the change by running the following two commands:
show crypto ikev1 sashow crypto ikev2 sa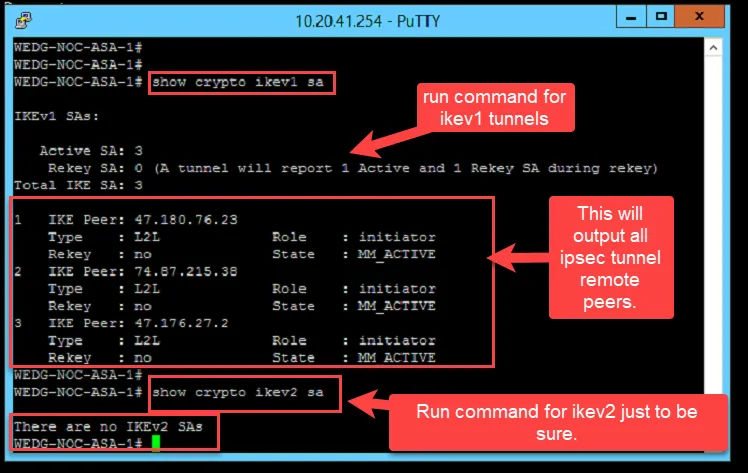
-
Install tftpd on server/management pc on the same LAN as the firewall
-
Create snapshot of the ASAv (if in our cloud)
-
Upload new firmware and asdm file to tftpd directory
On ASA:
Step 1
In privileged EXEC mode, copy the ASA software to flash memory.
copy tftp://x.x.x.x/asa9-18-4-22-smp-k8.bin disk0:/asa9-18-4-22-smp-k8.bin
Note: Be sure to change “x.x.x.x” to the IP of the TFTPD server, and update the asa9 filename if using a different version than 9.18.4.22.
Step 2
Copy the ASDM image to flash memory.
copy tftp://x.x.x.x/asdm-7202.bin disk0:/asdm-7202.bin
Note: Be sure to change “x.x.x.x” to the IP of the TFTPD server
Step 3
Access global configuration mode.
config t
Step 4
Show the current boot images configured (up to 4):
show running-config boot system
Example:
ciscoasa(config)# show running-config boot system
boot system disk0:/cdisk.bin
boot system disk0:/asa931-smp-k8.bin
Step 5
Remove any existing boot image configurations so that you can enter the new boot image as your first choice:
no boot system disk0:/asa_image_name
Example:
ciscoasa(config)# no boot system disk0:/cdisk.bin
ciscoasa(config)# no boot system disk0:/asa931-smp-k8.bin
Step 6
Set the ASA image to boot (the one you just uploaded):
boot system disk0:/asa9-18-4-22-smp-k8.bin
Example:
ciscoasa(config)# boot system disk0:/asa9-18-4-22-smp-k8.bin
Step 7
Set the ASDM image to use (the one you just uploaded):
asdm image disk0:/asdm-7202.bin
You can only configure one ASDM image to use, so you do not need to first remove the existing configuration.
Example:
ciscoasa(config)# asdm image disk0:/asdm-7202.bin
Step 8
Save the new settings to the startup configuration:
write memory
Step 9
Reload the ASA:
reload
TEST
- Verify IPSEC tunnels re-estblish by running the two commands:
show crypto ikev1 sa
show crypto ikev2 sa
If tunnels do no come back online, verify the remote firewall has its VPN settings changed to DH Group 14. Alternatively, you can set the ASA back to DH group 2 but it is not recommended.
-
Test Remote Access VPN.
-
Test Internet Access
-
Verify N-central alerts clear. Remove Downtime from N-central.
Final Steps:
- If all tests are successful, output running config to new .txt file.
- Delete Snapshot. Only delete snapshot if you confirm everything is working 100%.
Backup Plan:
- If needed, revert back to backup configuration:
copy flash:/backupconfiguration startup-config
Reboot ASA.
- If backup configuration does not work, then revert back to last snapshot. (This is for ASAv in our cloud only. Not for on prem ASA firewalls.)
REFERENCE LINK: https://www.cisco.com/c/en/us/td/docs/security/asa/upgrade/asa-upgrade/asa-appliance-asav.html#ID-2152-00000110
Process References:
Section titled “Process References:”- Create a relationship back to related process. Note: Please add KB relationships to core process, process, SOPs or other WIs on the right.