System bundle
Section titled “System bundle”Overview
Section titled “Overview”The base bundle that’s installed with every instance of Dreamtsoft. The bundle is where foundational elements of the system are defined; it also contains the user table and authentication process. The system bundle includes Users & Groups, email account set-up, Tenancy (a.k.a. Spaces), scheduled jobs, and auditing. It also has visibility to the artifacts in all of the installed bundles, however, the system bundle is its own bundle and may have its own configurations.

Dreamtsoft keeps track of all changes made to the system and flags those changes with the name of the bundle that the change was made in; this is done to make it easier to keep track of development efforts and not force arbitrarily-defined “containers” for changes. It should be noted that due to this feature, it’s important to keep an eye on the bundle being used at any given time to ensure that changes will end up in the right place. One can check that the right bundle is being used by looking at the URL at the top of the browser, in particular the bundle portion of the URL.
The URL format is as follows: https://sitename.dreamtsoft.com/s/spacename/bundlename : areaname/pagename
Features
Section titled “Features”Other features of the system bundle are authentorization and credibility. Authentorization is used to set the authentication and authorization configurations. These can be accessed by going to System Bundle -> Authentorization -> Authentication OR Authorization. Credibility is used to set all certificates and credentials. These can be accessed by going to System Bundle -> Credibility -> Certificates OR Cert Providers OR Credentials.
Bundle
Section titled “Bundle”Overview
Section titled “Overview”The primary navigation and storage reference for all development. Bundles can be thought of as “applications” and allow one to navigate to a particular section of the platform and in there, view pages/components/buckets/CSS in whatever form the bundle’s developer decided to arrange it in.
Creating a Bundle
Section titled “Creating a Bundle”To create a bundle, proceed to the correct space, then on any page, press Alt+W (for Windows/Linux) or Option+W (for Mac). The workspace slide-out will appear with all the installed/subscribed bundles. Select the + button at the top right.
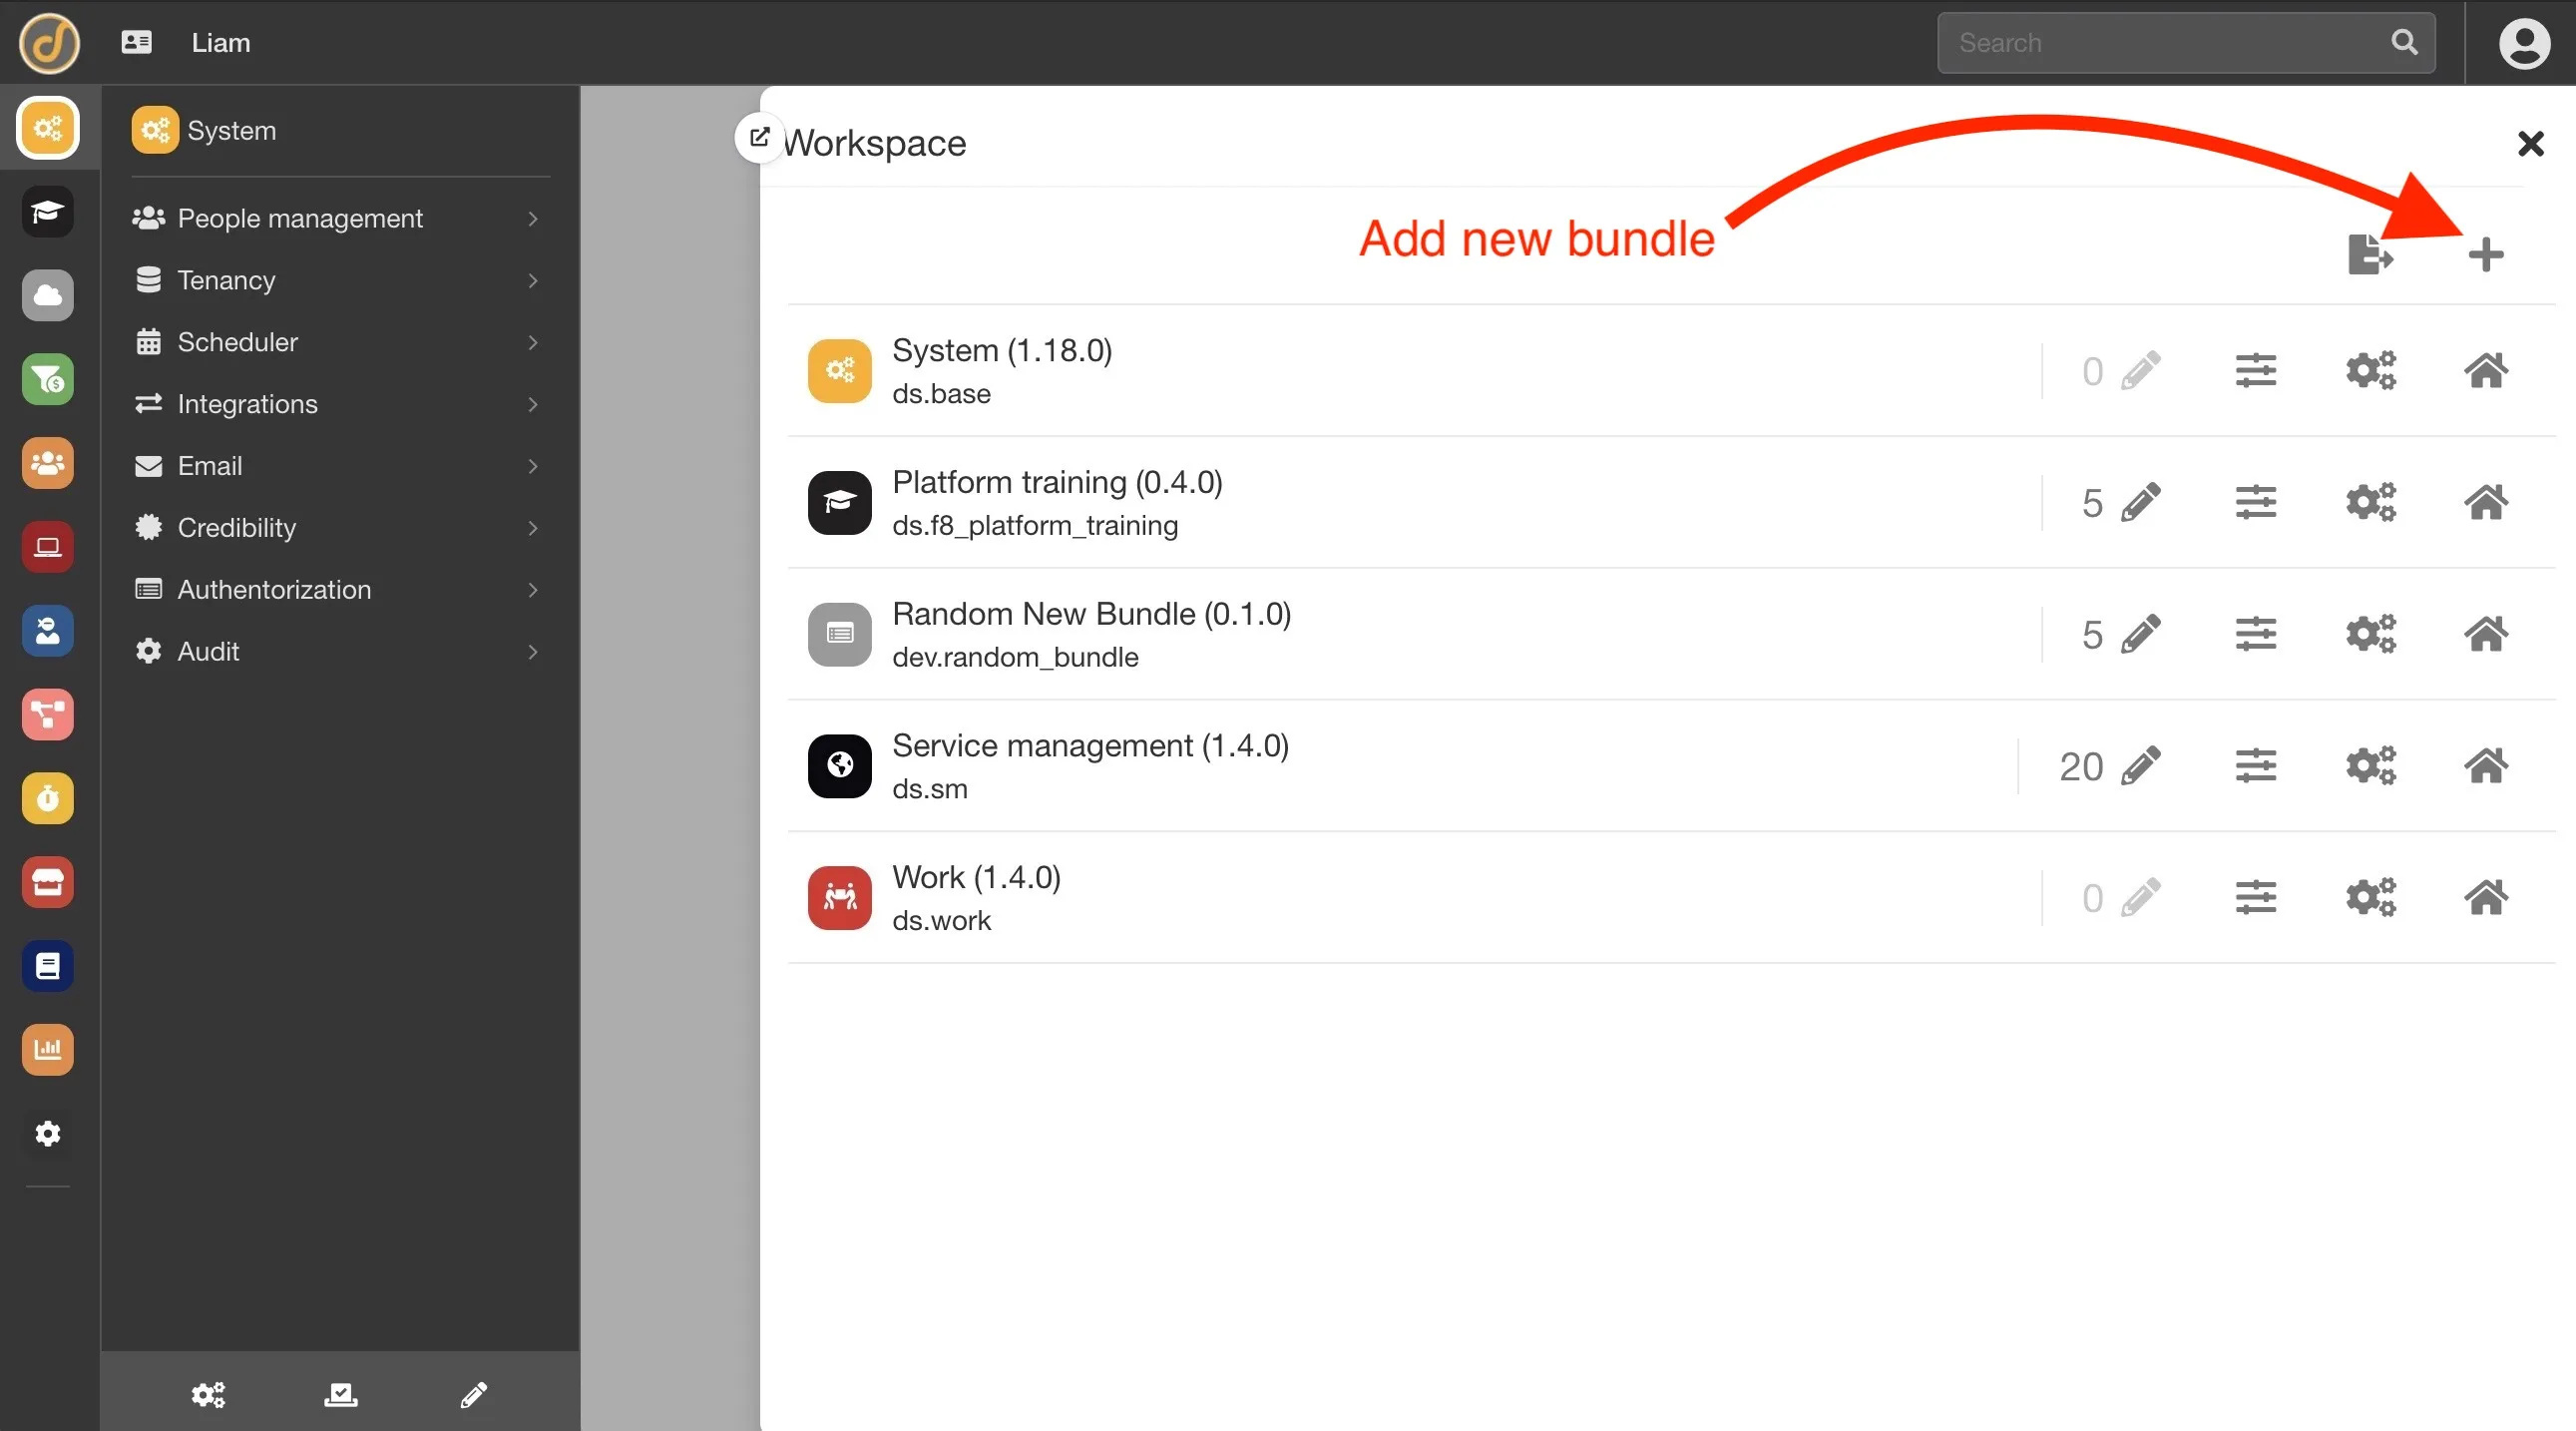
Select “Create new bundle”, configure any information needed for the bundle, and then click OK.
Loading Bundles
Section titled “Loading Bundles”Dreamtsoft also allows loading bundles for remote repositories into a site, either from the store or an external repository. To load a bundle from the store, follow the steps below:
1. Navigate to the site’s bundle page, found at http://sitename.dreamtsoft.com/#/ds.base/bundles.
2. Click the Manage Bundles button at the top of the page.
3. In the Manage Bundles menu, select “Load a new bundle from the store”.
4. Select the appropriate Vendor at the top. This will cause the list of bundles to refresh.
5. Find the bundle to be loaded and click the Install button on the right. The bundles screen will then refresh. If the bundle doesn’t show up after the loading screen disappears, manually refresh the page. The bundle should now show up on the bundles page in the form of a new “bubble”.
To load a bundle from a URL (external repository), follow the steps below:
1. Navigate to the site’s bundles page, found at http://sitename.dreamtsoft.com/#/ds.base/bundles.
2. Click the Manage Bundles button at the top of the page.
3. In the Manage Bundles menu, select “Load a new bundle from a URL”. Enter the following information:
-
Username - The username for the account listed in the URL above
-
Password - The password for the account listed in the URL above 4. Click the OK button at the bottom of the screen. The bundles screen will then refresh. If the bundle doesn’t show up after the loading screen disappears, manually refresh the page. The bundle should now show up on the bundles page in the form of a new “bubble”.
Bundle Subscription
Section titled “Bundle Subscription”Certain spaces can be given access to bundles using bundle subscriptions. Go to the space tree view and click on the name of the space, followed by “Manage bundles”.
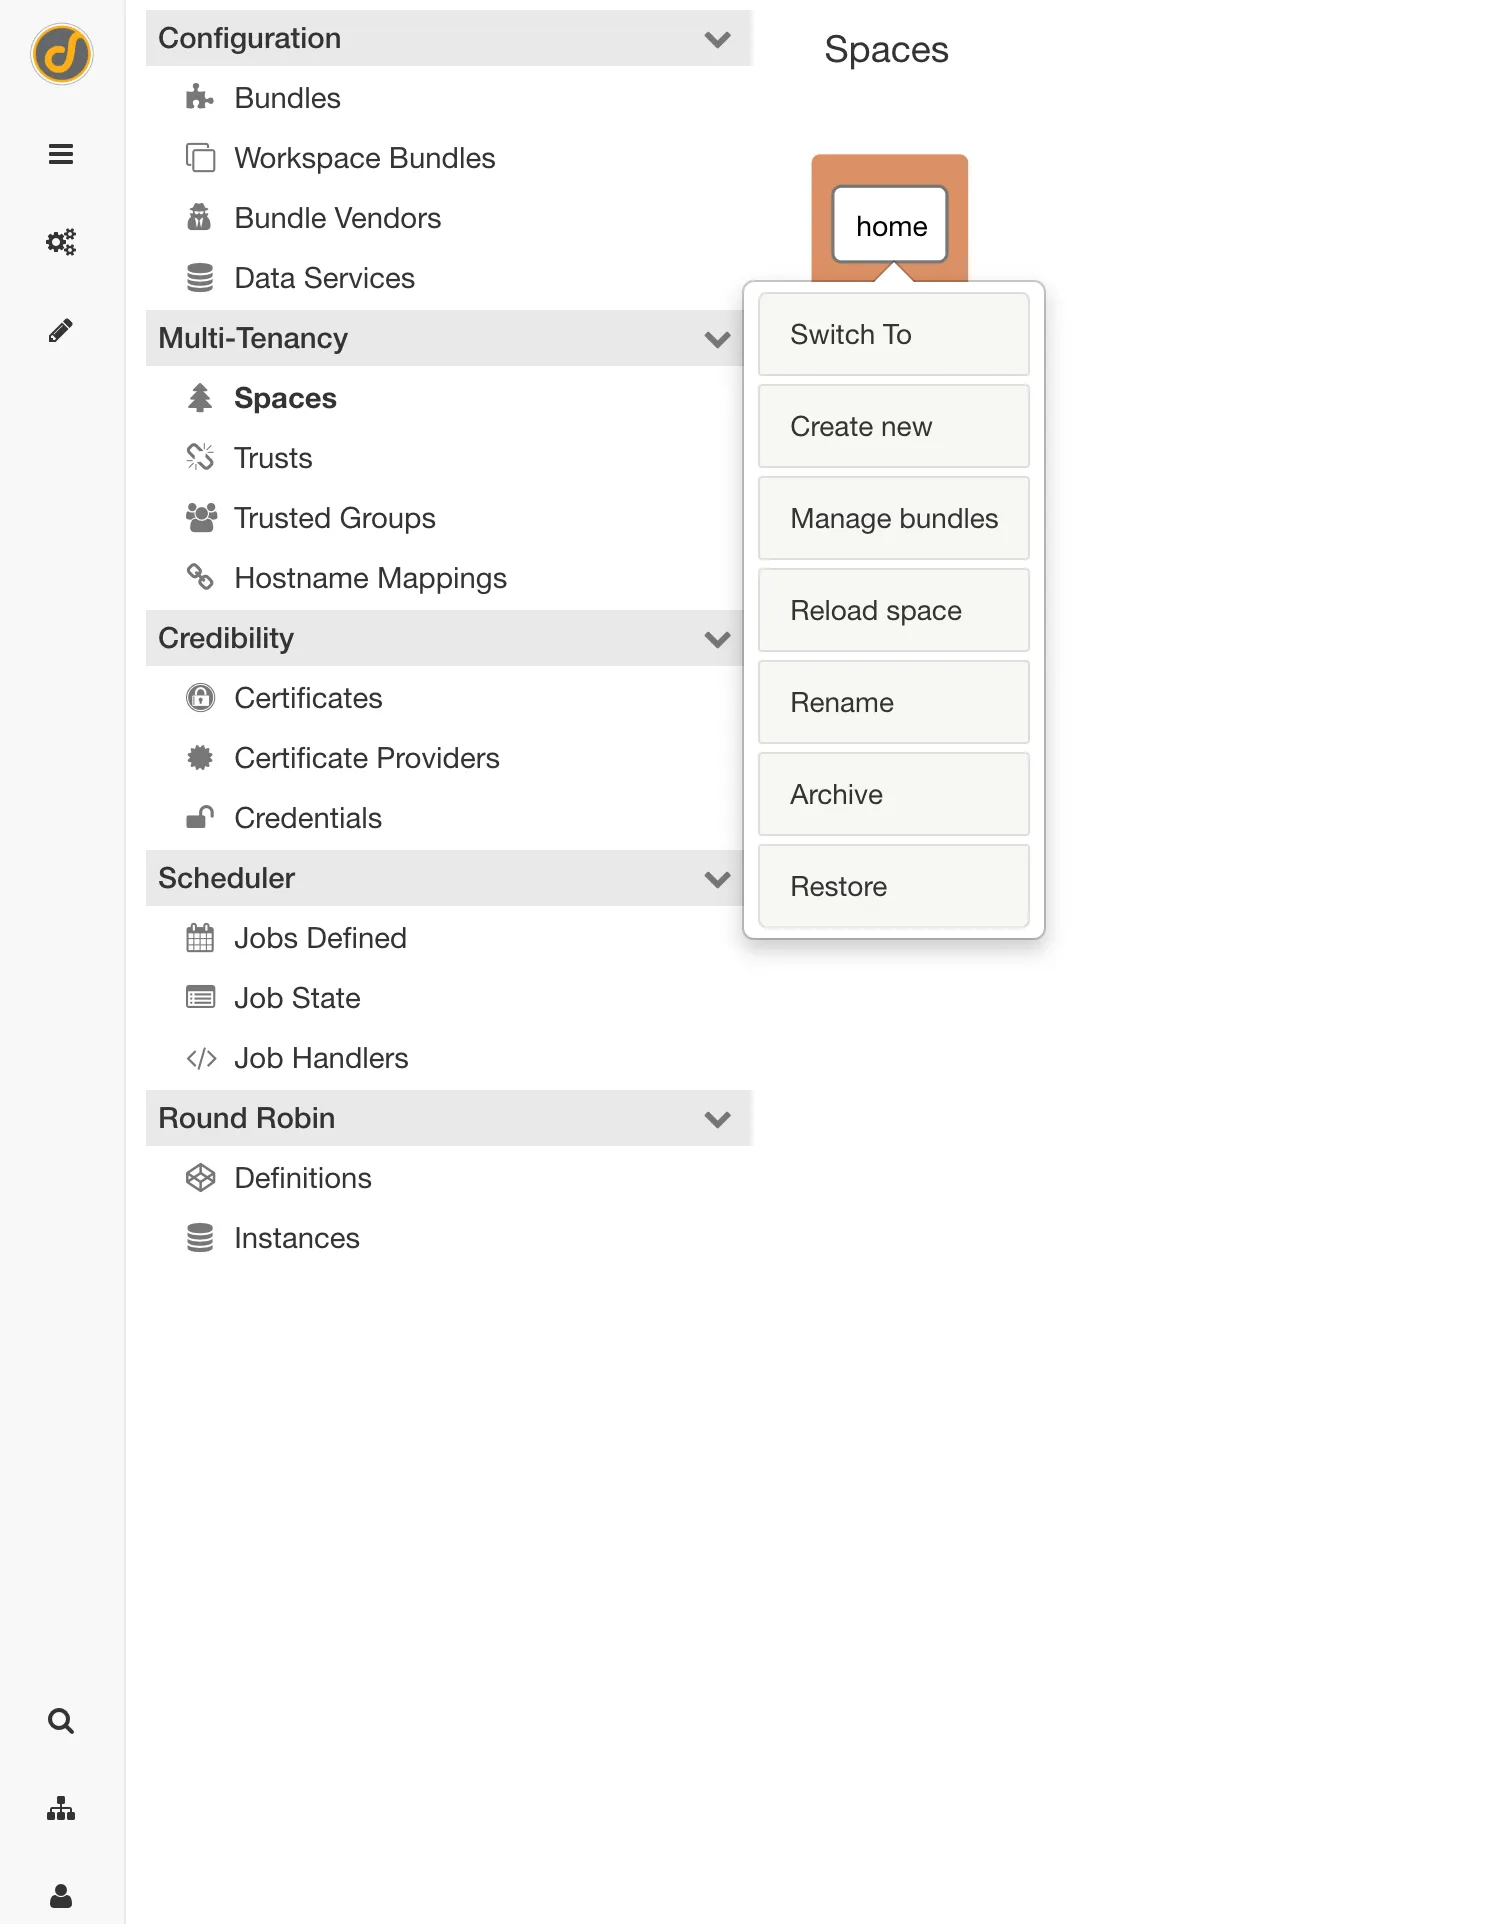
This will open a view of all the bundles available in that space; one can install, advertise, or give no access to the space one is in. Selecting Install will give access to the bundle. Selecting Advertise will let any subspace or child space see that a respective bundle is available for install. Selecting No access will make it so the bundle can’t be used and the child space won’t see that this bundle is available for install.
Managing Bundles
Section titled “Managing Bundles”Dreamtsoft keeps track of all changes made to the system and flags those changes with the name of the bundle that the change was made in; this is done to make it easier to keep track of development efforts and not force arbitrarily-defined “containers” for changes. It should be noted that due to this feature, it’s important to keep an eye on the bundle being used at any given time to ensure that changes will end up in the right place. One can check that the right bundle is being used by looking at the URL at the top of the browser, in particular the bundle portion of the URL.
The URL will always be in the following formats:
-
http://home.dreamtsoft.com/#/ds.crm/home
-
http://start.dreamtsoft.com/#/ds.base/home/list.default.bundle The buttons for managing the bundle can found at the upper right corner of the page while inside the bundle.
Bundle Configuration/Information
Section titled “Bundle Configuration/Information”The bundle information page allows setting the basic bundle parameters, such as the title, banner, and theme. Certain slots aren’t editable in this screen as they’re only set when a bundle is created and can’t be changed. To reach this location, click the gears icon, then Information. The following fields will then be available:
-
Title - The wording that shows up on the main Bundle selection screen
-
Vendor - Cannot be changed
-
Type - Cannot be changed
-
URL - Cannot be changed
-
Username - The username for the git repository where the bundle lives
-
Password - The password for the git repository where the bundle lives
-
ID - Cannot be changed
-
Icon - The image that shows up on the main Bundle selection screen
-
Theme - The CSS theme that the bundle will use
-
Banner - The custom banner that the bundle will use
Revert Bundle Changes
Section titled “Revert Bundle Changes”To revert changes made to a bundle, press Alt+W (or Option+W on Mac). Select the pencil icon next to the bundle to revert, mark the desired changes to revert from the list, then press the revert button below the selected bundle.
Local and Remote Changes
Section titled “Local and Remote Changes”Local changes or overrides can be seen by pressing Alt+W (or Command+W on Mac), then selecting the pencil icon next to a bundle. These are changes that haven’t been pushed or are overrides of an installed/subscribed bundle. These can also be accessed by going to an area in the bundle, then navigate to Bundle Configuration -> Information -> Scroll to Bottom of Page. Selecting remote updates from this page will show the remote changes from git that haven’t been pulled yet.
Buckets and Slots
Section titled “Buckets and Slots”Overview
Section titled “Overview”Buckets are a reference to data in the platform. Dreamtsoft data can be stored in any number of formats and locations.
Creating Buckets
Section titled “Creating Buckets”Once a bucket has been created and accessed, select the gears icon in the lower left side of the navigation menu, then click Bucket Management. Click Buckets in the page that opens; selecting the plus sign here allows the option to add a bucket.
Labels
Section titled “Labels”All buckets must have at least one label. Each label entry needs to include both a singular and plural version of the label text. Note: Press the Tab key after entering the singular version of the label in order to auto-populate the plural version of bucket Name.
A bucket’s Name is required to be all lowercase with no spaces or special characters, with the exception of underscores. It’s recommended to use underscores between words. This slot is only available at bucket creation and cannot be changed once the bucket has been created.
Bucket types are what control how a bucket is stored on the backend. Below are a list of bucket types:
-
Table (default) - Standard data that is input into the system (such as users, incidents, groups, etc.). This is stores out in PostgresSQL database in JSONB format.
-
Classification - A classification of a table that inherits the data model from the parent’s table.
-
Script - Relies of a Script Mapper to push/pull data. Choosing this requires specifying a “mapper” attribute.
-
Configuration - Houses data that holds administrative setup/configuration; this is collected and pushed to git with the rest of the bundle configuration.
-
Files - Houses files such as attachments, pictures, etc. that need to be stored in a traditional file structure.
Data Service
Section titled “Data Service”The data service slot points to the data service that will be managing the data. 99% of the time, this will remain the default data service. Any additional data services used to manage data should be specified here.
Attributes
Section titled “Attributes”Attributes are meant to supplement the bucket with miscellaneous additional pieces of data. The following is a list of available attributes:
-
Collection - The name of the collection bucket one wants to this bucket to extend from.
-
Default sort - The name of the slot one wants the system to default to sorting the records by (usually something like “updated” or “created”).
-
Display - The name of the slot (usually “name”) that will represent this record when referenced.
-
Hidden - Set to “true” if the bucket shouldn’t be a selectable option when selecting buckets in the platform.
-
Many link - An object representing the many-to-many nature of the bucket. Format as seen below for the “user_to_group” bucket:

-
Mapper - The name of the script mapper that this bucket will leverage.
-
Password - Specifies the value for the “password” variable passed to the script mapper.
-
Table - Specifies the value for the “table” variable passed to the script mapper.
-
URL - Specifies the value for the “URL” variable passed to the script mapper.
-
Username - Specifies the value for the “username” variable passed to the script mapper.
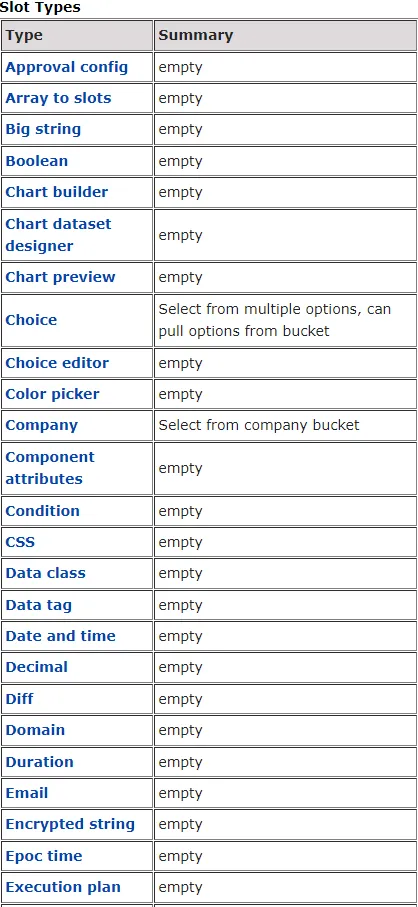
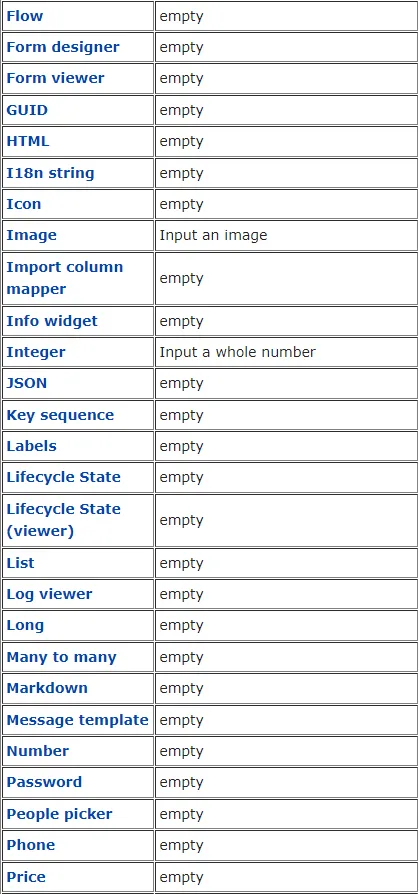
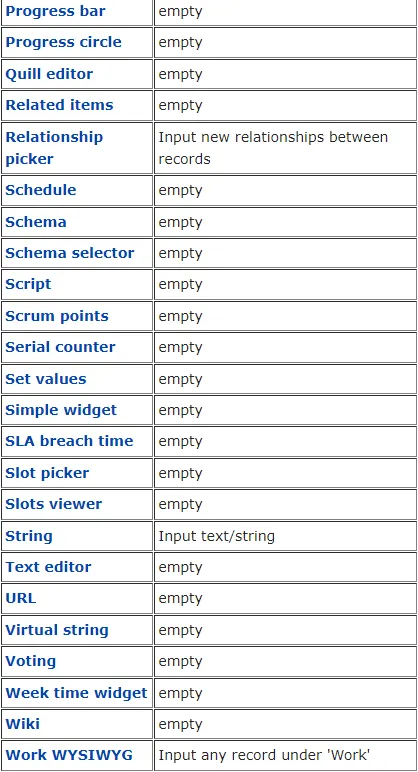
Slots are similar to columns in a database. When creating slots, they follow the same rules as buckets for the label, name, and attributes. The “Type” field has more options than that for the bucket type. Slot types are where data is defined as being entered as a string, integer, state, phone number, etc. See below for a list of slot types. Note: New slots can also be created when editing the details component.
Lists and Forms
Section titled “Lists and Forms”Overview
Section titled “Overview”Once buckets and slots have been created, how one interacts with the data will then need to be configured. When a table is created, two pages are created automatically:
-
list.default.[BUCKET NAME] - A raw list view of the table data
-
details.default.[BUCKET NAME] - A raw form view of the record data
Configuring the List Page
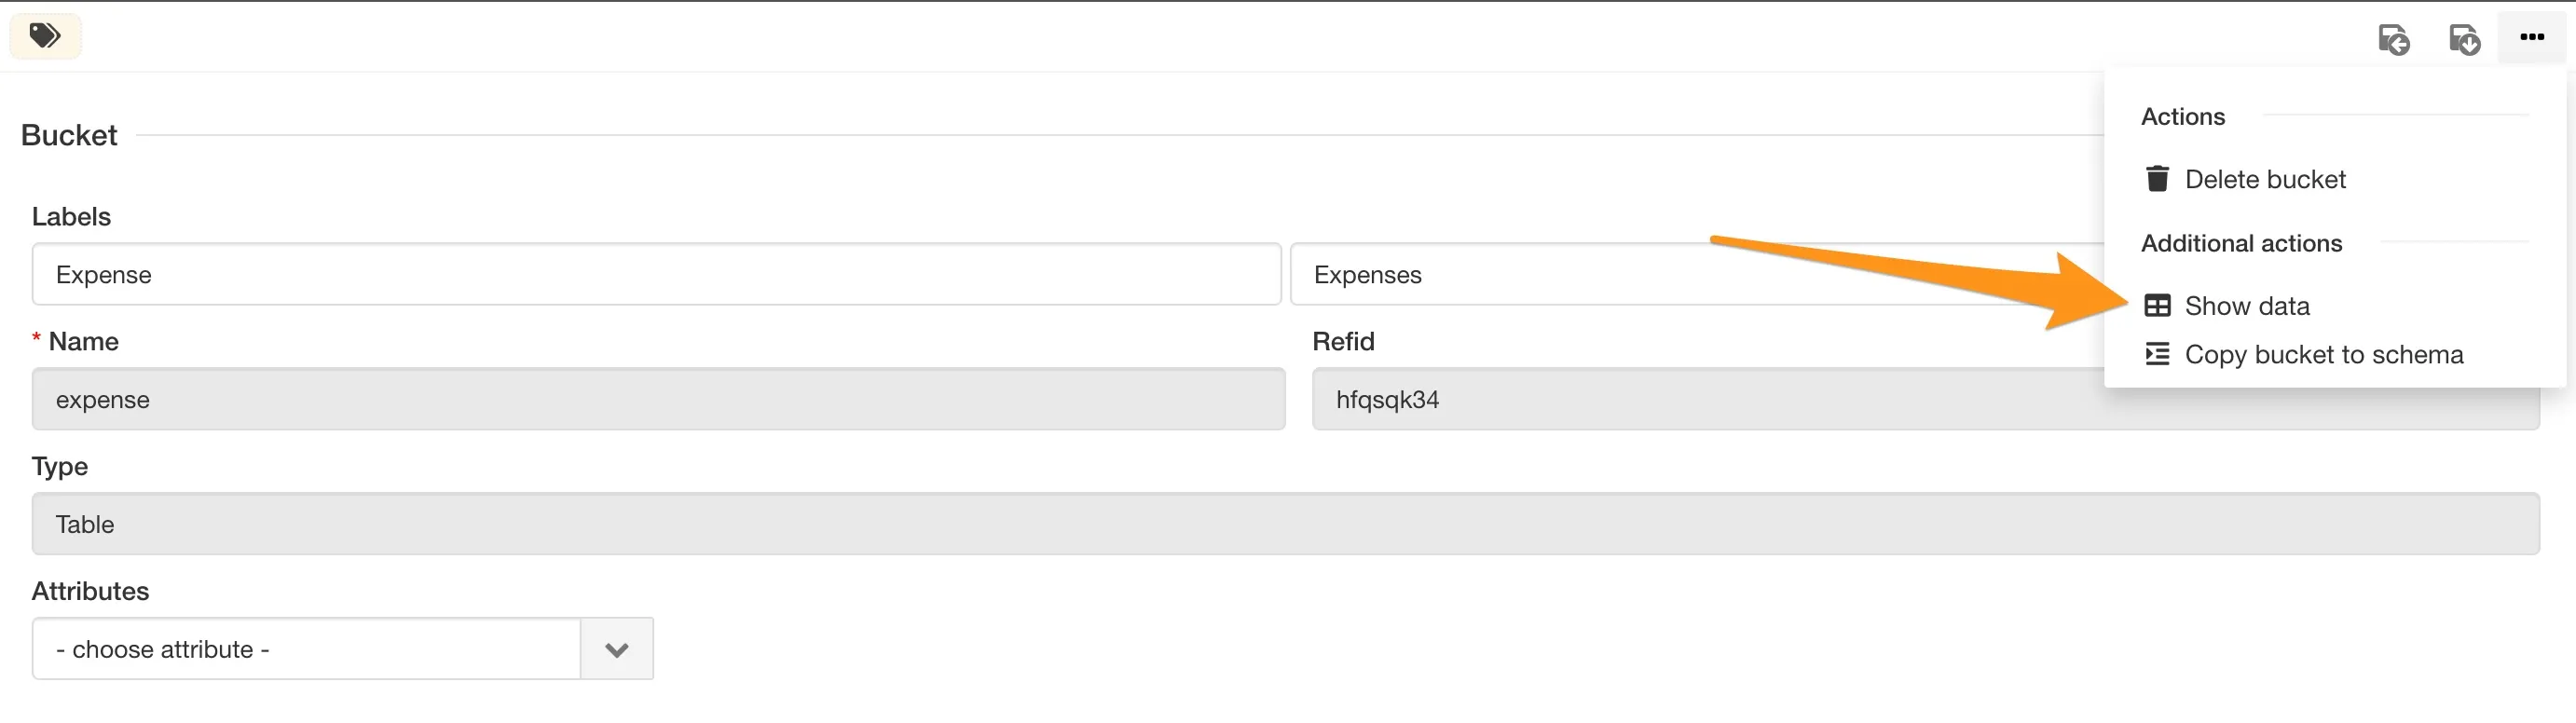
Section titled “Configuring the List Page”The next step is to configure the list and form views; to do this, one will need to access these pages. On the bucket definition page, click the … at the top right to show the “Show data” option from the drop-down menu. This will open the list.default.[BUCKET NAME] page.
The page can also be reached by adding list.default.[BUCKET NAME] to the end of the URL http://dreamtsoftinstance.com/s/SM/dev.myapp/list.default.expense
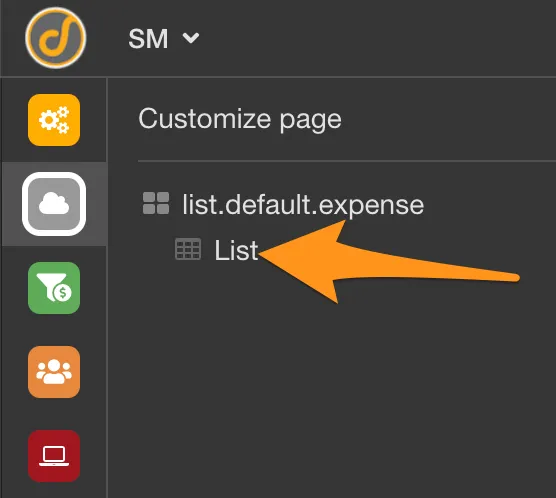
On the list page will be a raw list component that needs to be configured. Click the admin tools pencil icon at the bottom of the left navigator. This is the layout editor that allows one to customize pages and their components. A menu item with the name of the list.default.[BUCKET NAME] page will be displayed there, with an item below it called the list. Click the list component to configure it.
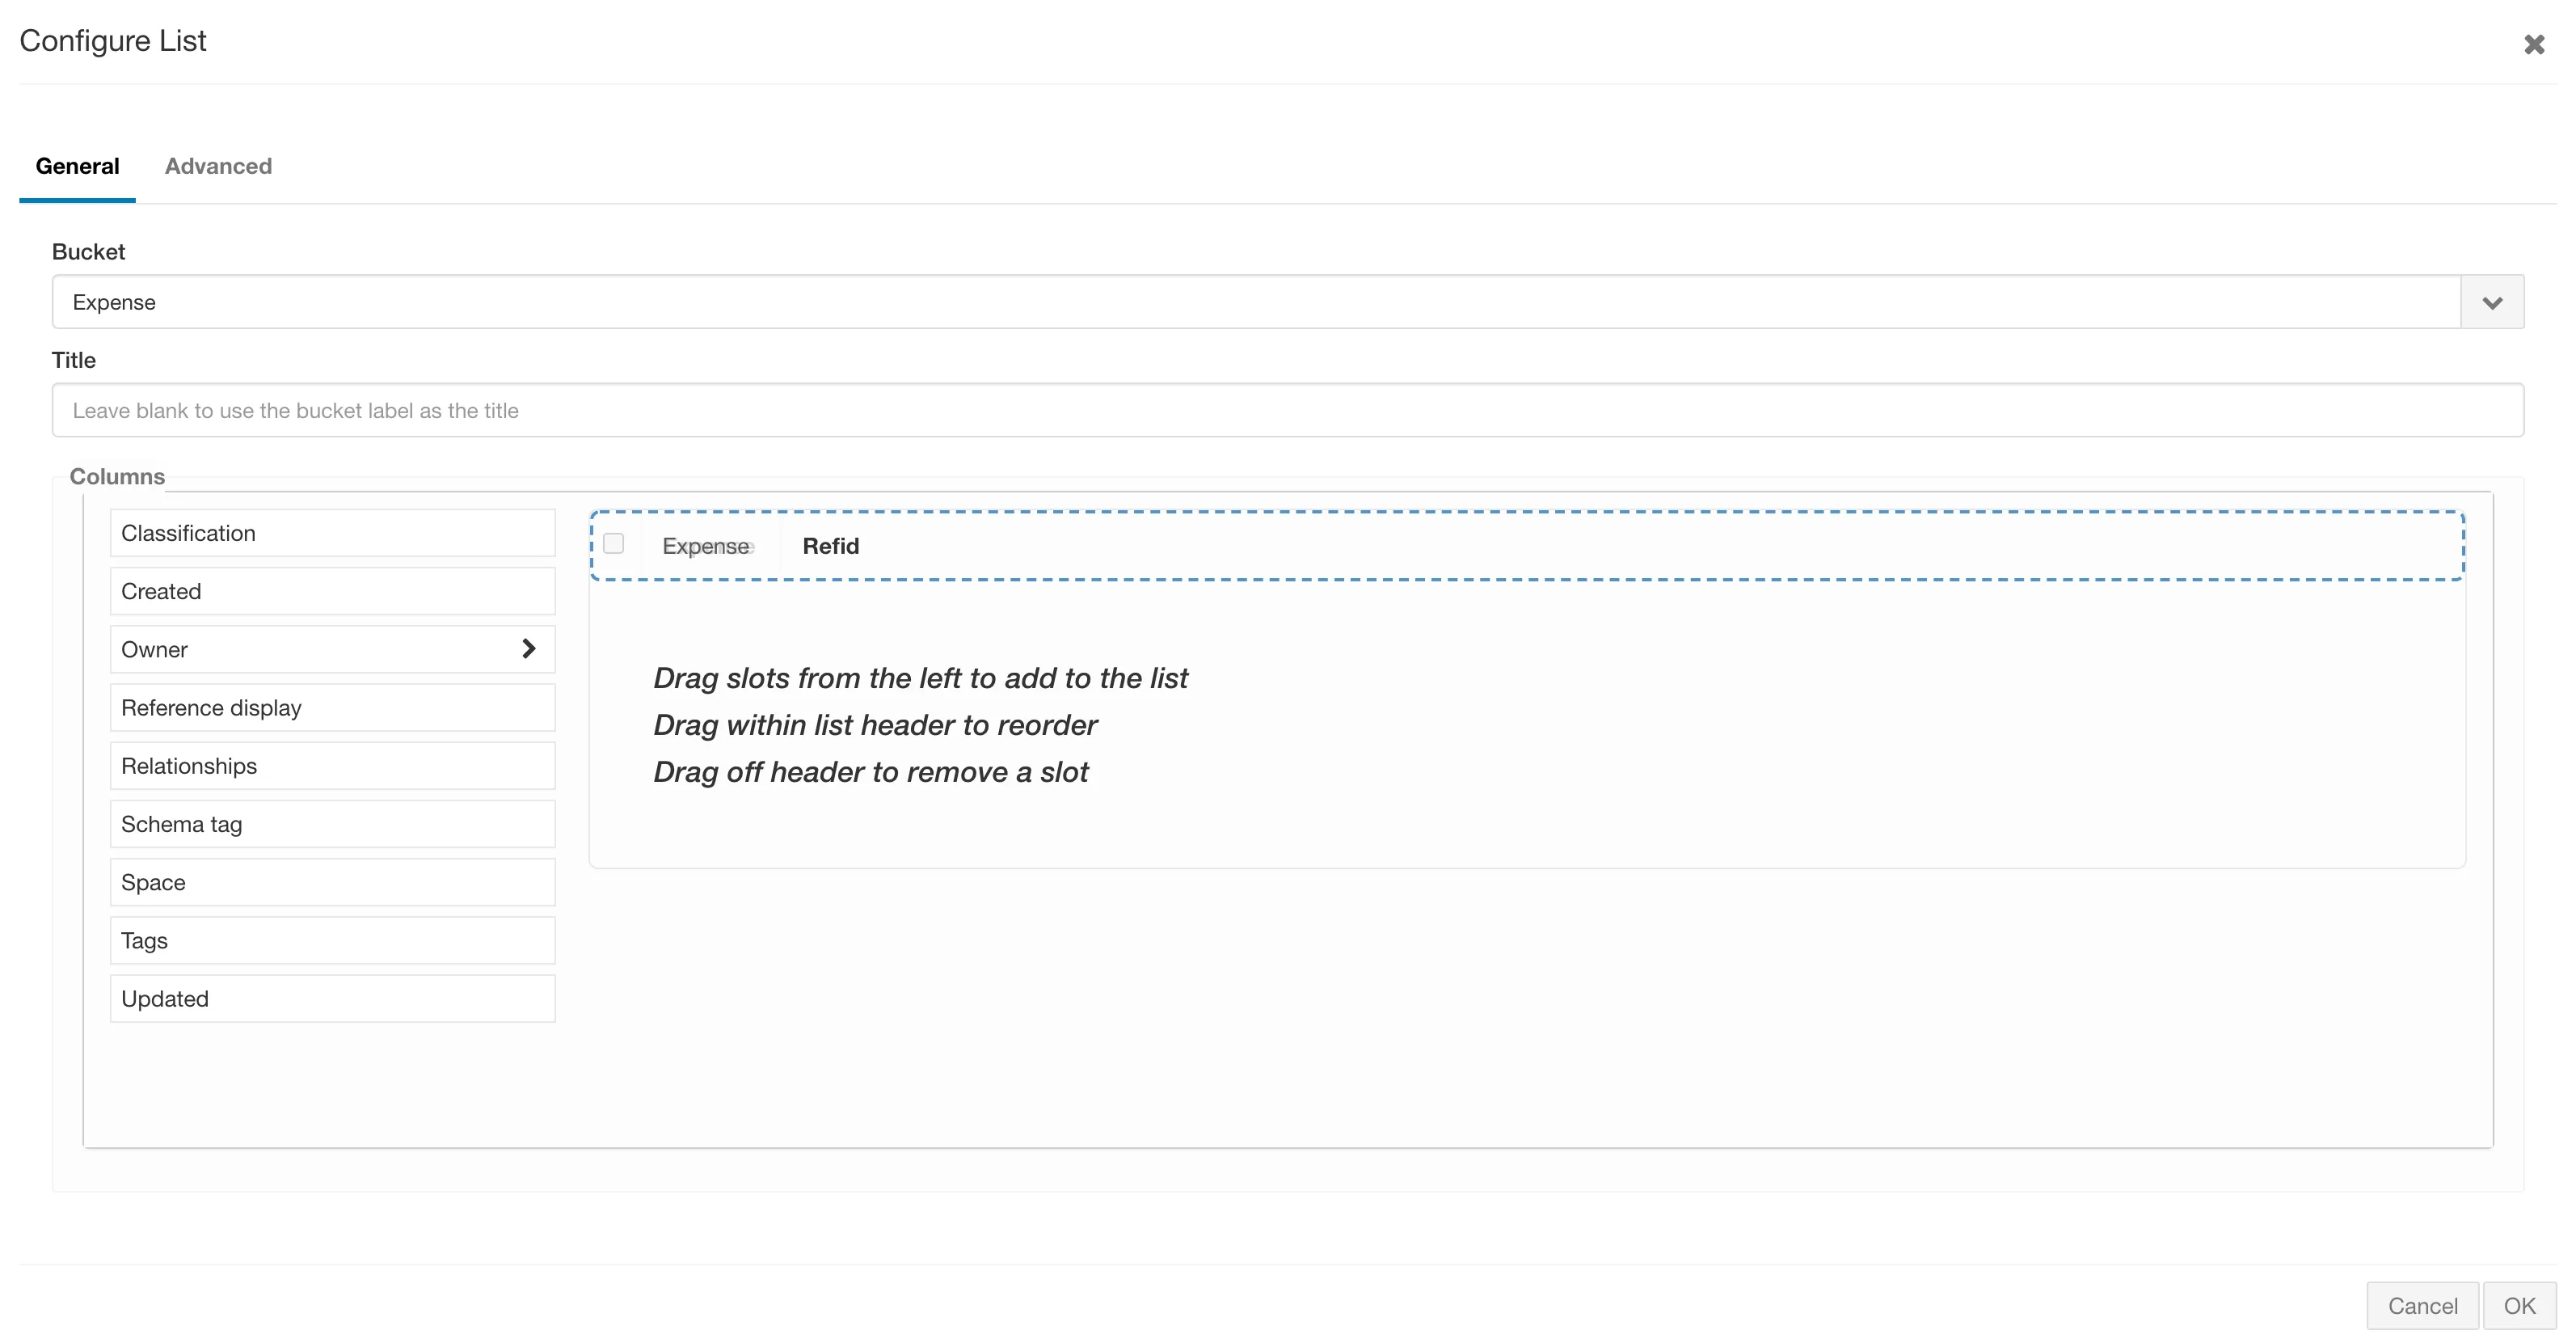
To add default columns to the list view, drag the slots from the columns section to the header section of the list. For more advanced features, click the Advanced tab and adjust the attributes.
Configuring the Details (Form) Page
Section titled “Configuring the Details (Form) Page”To configure the details (form) page, click on the + icon on the list page to create a new record.

One can also navigate to the details page by simply appending details.default.[BUCKET NAME] to the end of the URL. However, the details component requires a GUID parameter to display an individual record (e.g. ?q=cd59fcbd261e4baba18559534d906001); however, to display a new record the ?new=true parameter needs to be added.

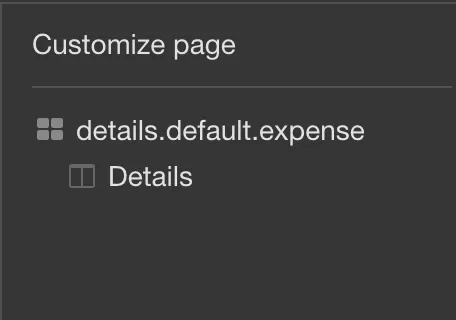
The new record page contains a raw details component that needs to be configured. Click the admin tools pencil icon at the bottom on the left navigator. This is the layout editor that allows one to customize pages and the components on those pages. A menu item with the name of the page (details.default.[BUCKET NAME]) and below it, a component called details will be displayed there. Click Details to configure the form.
To add slots to the details page, drag the slots from the left column to the right canvas pane. To format the form with two columns, one can drag a new two column on the page and then drop the slots inside of it.
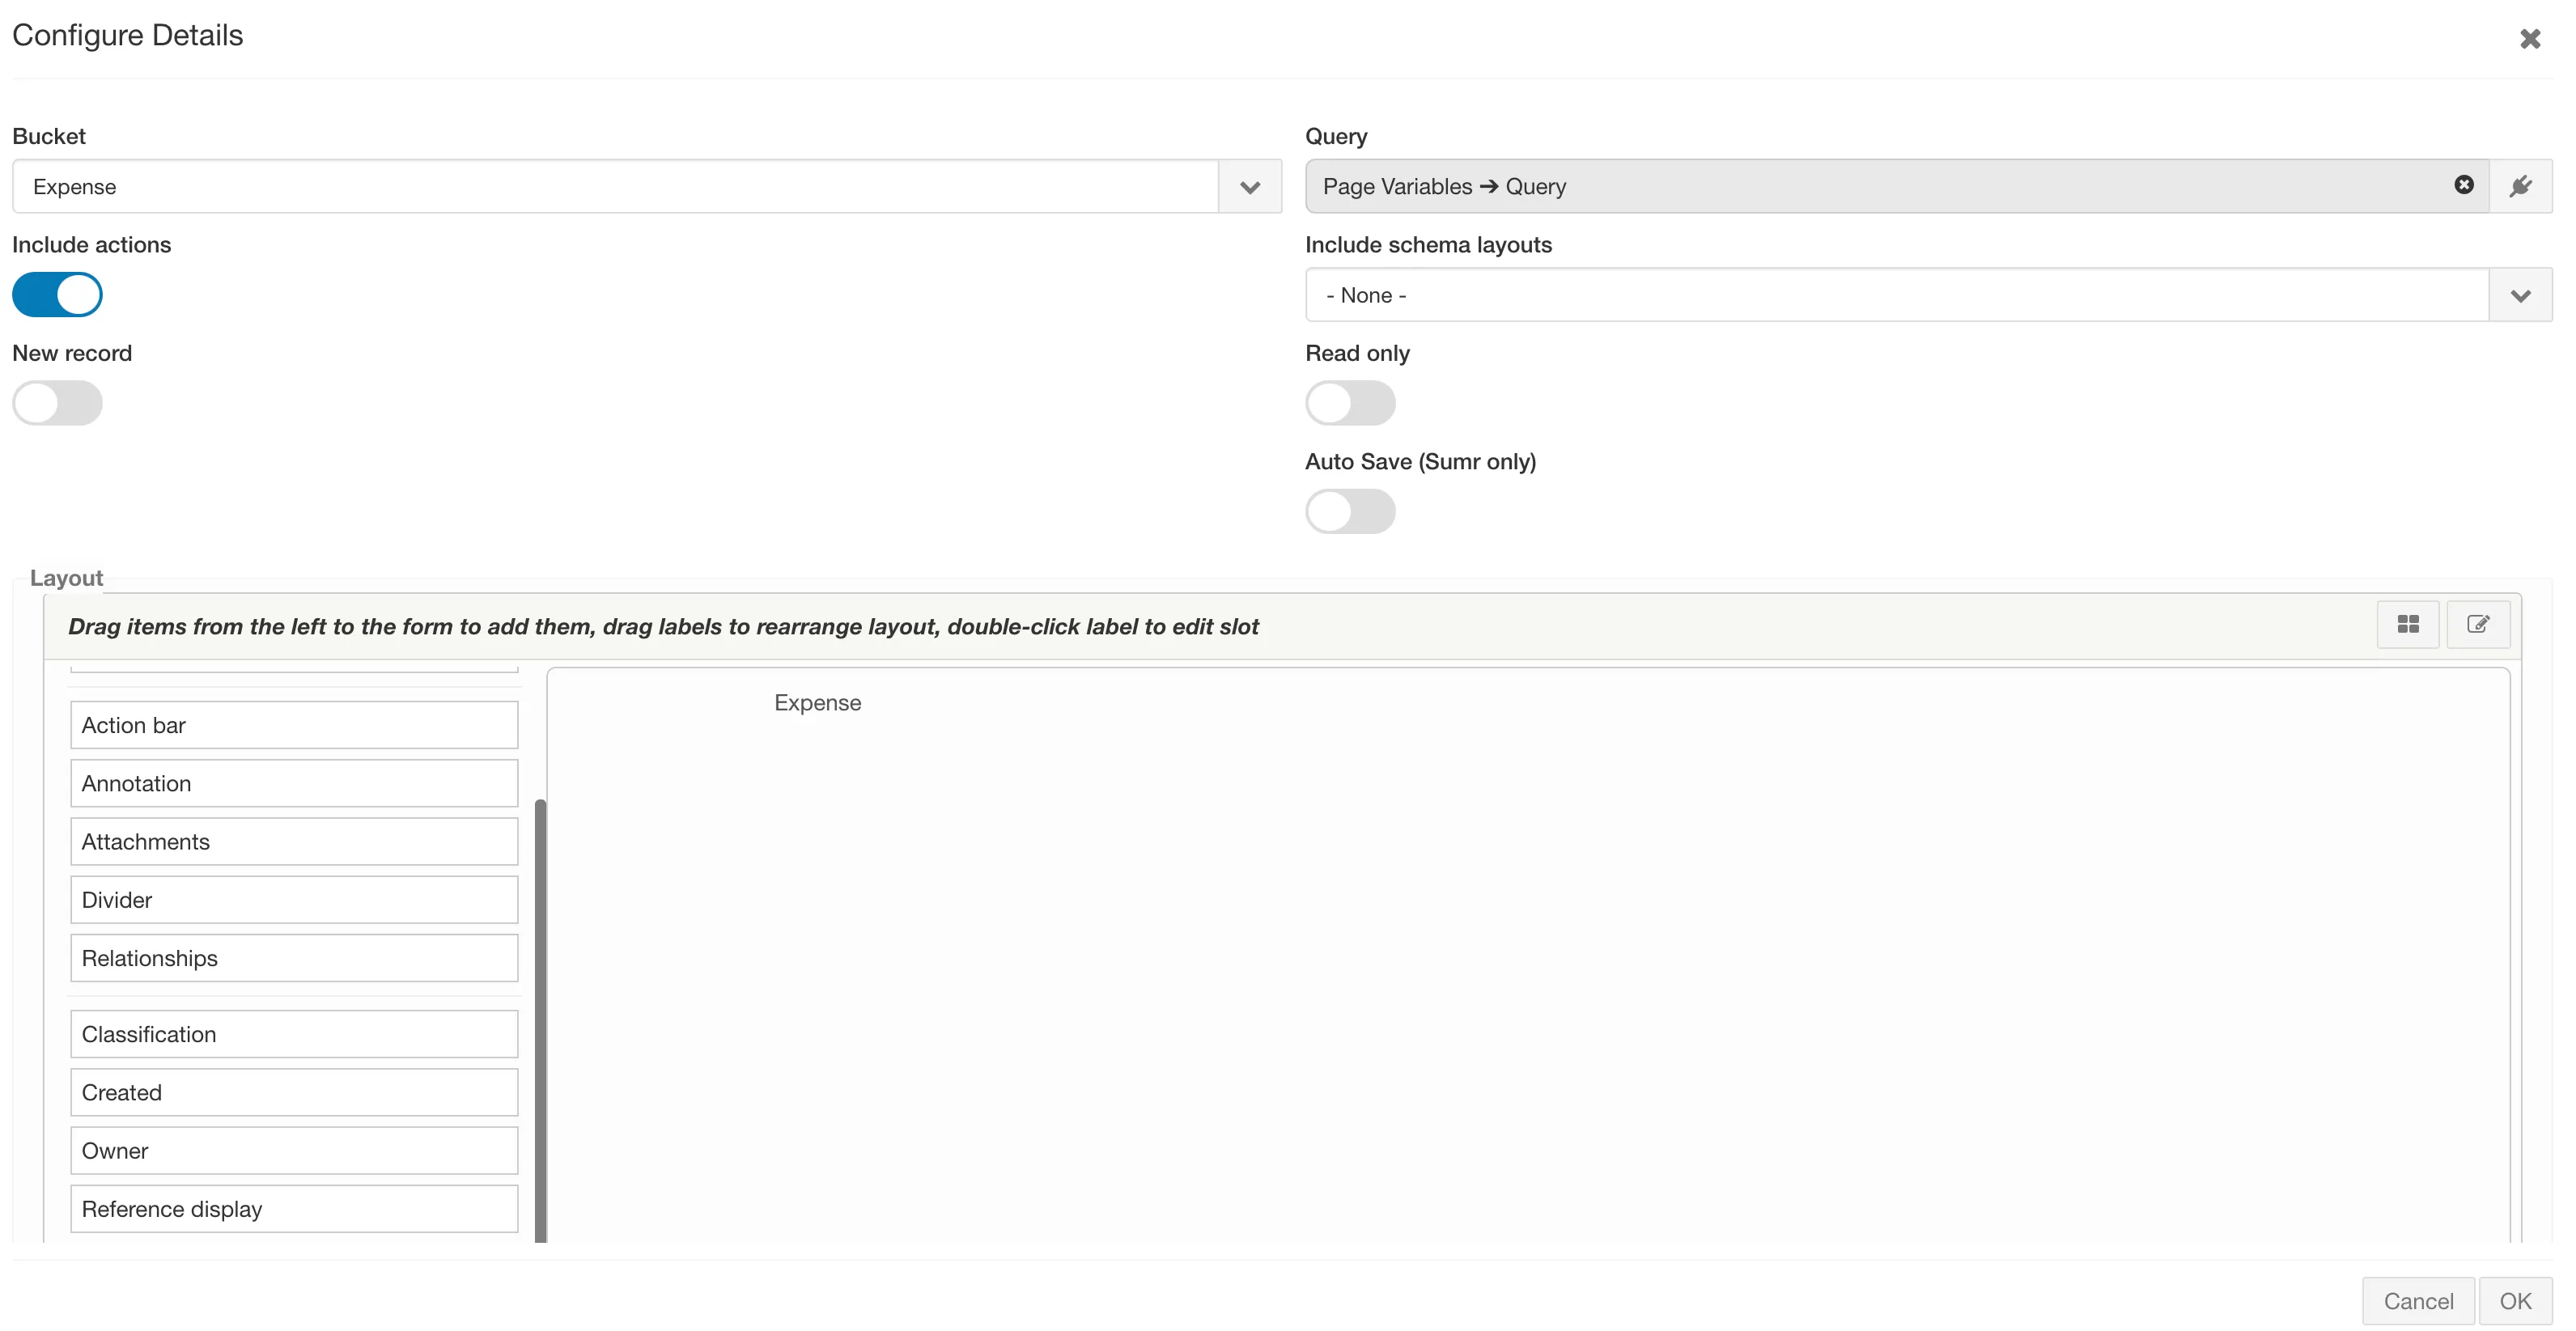
In addition to adding slots to the details component, the following can also be dragged from the left column:
-
Action bar - Custom buttons placed on the form
-
Annotation - Text to provide form instructions
-
Attachments - Section to display attachments
-
Divider - Line to separate sections
-
Relationships - A special section to display any relationships to other records
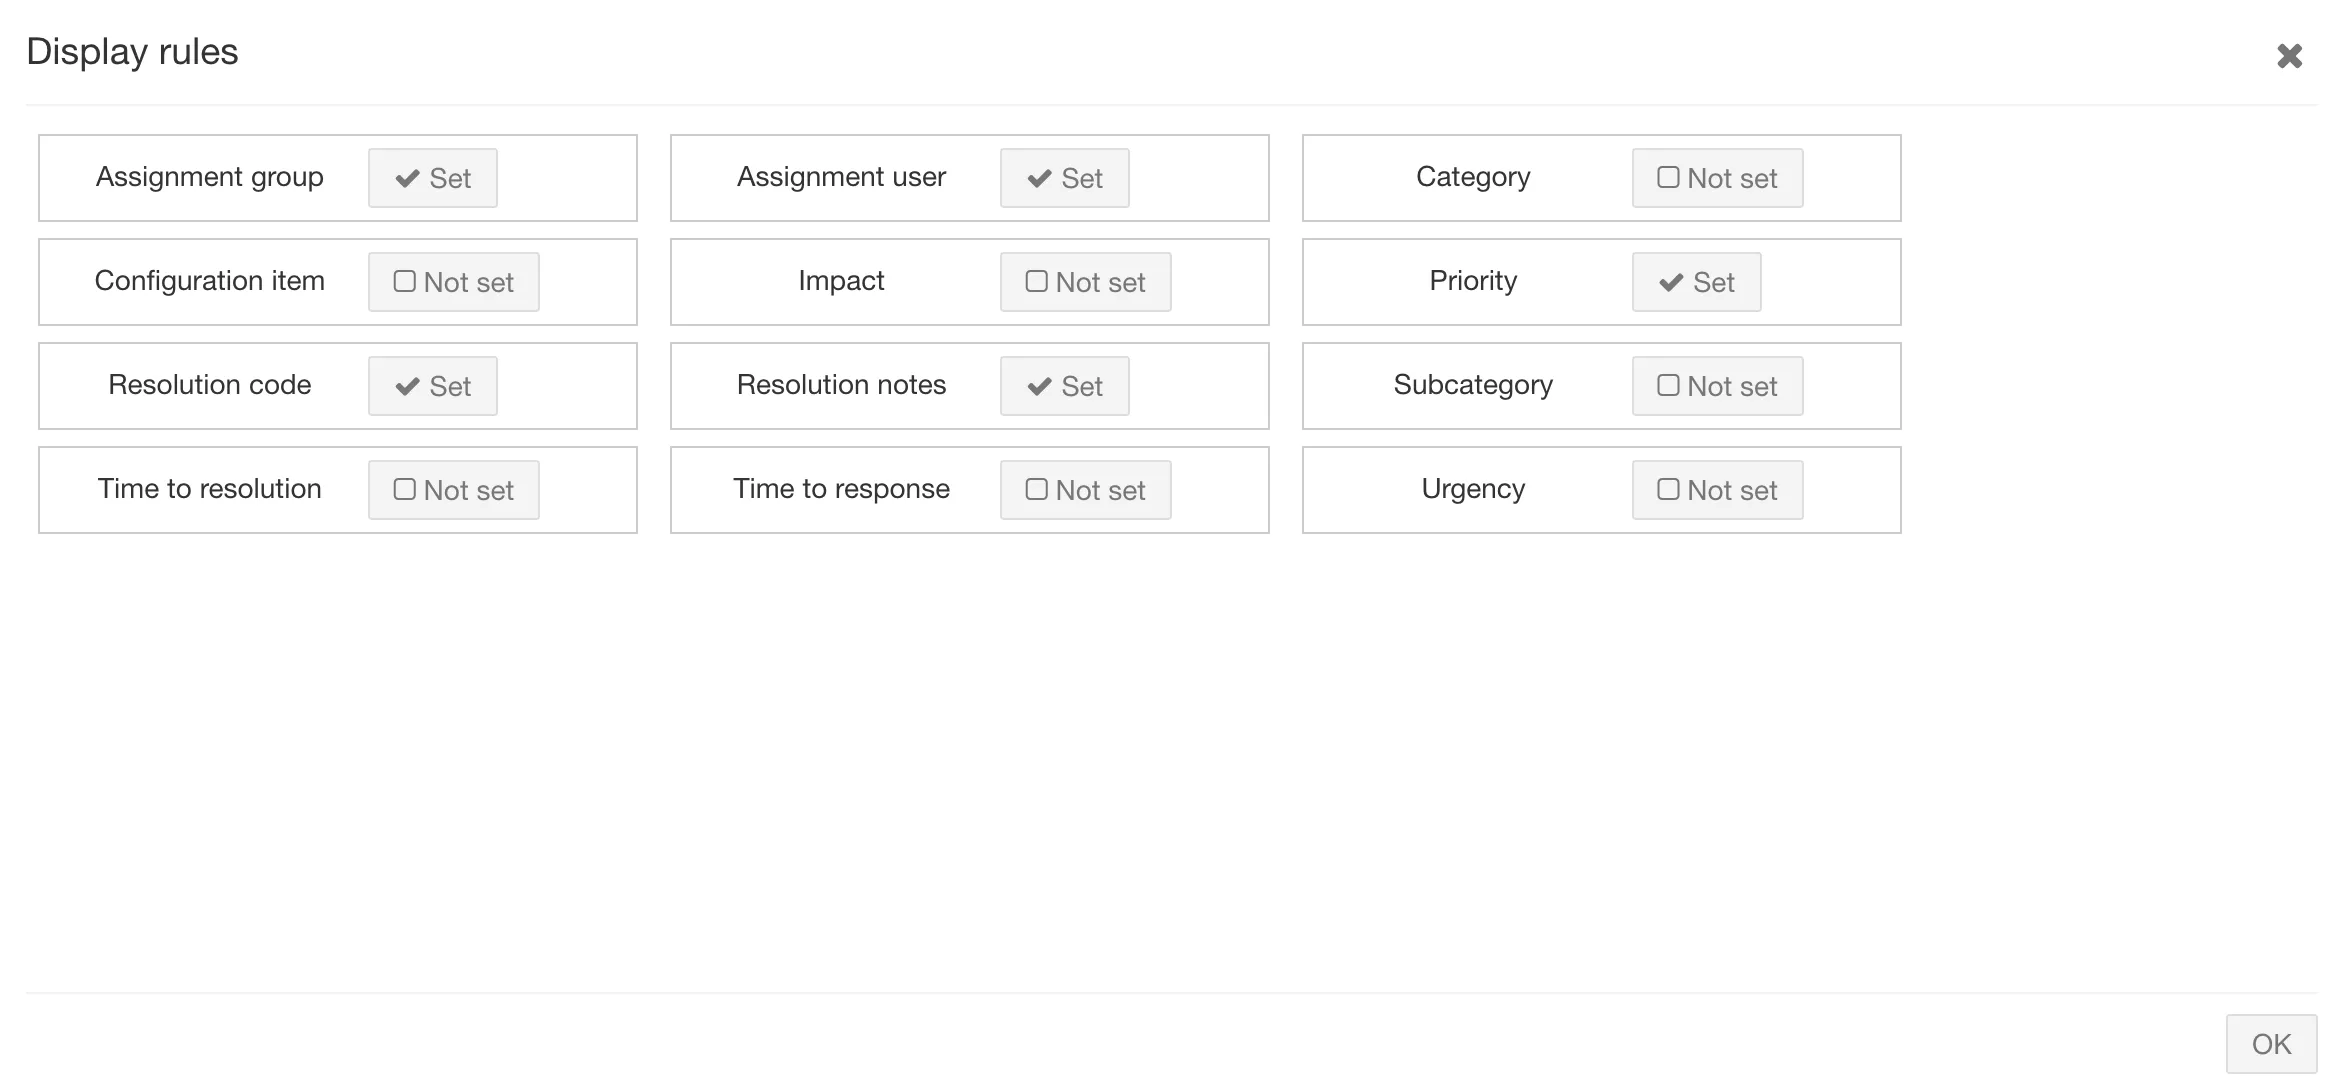
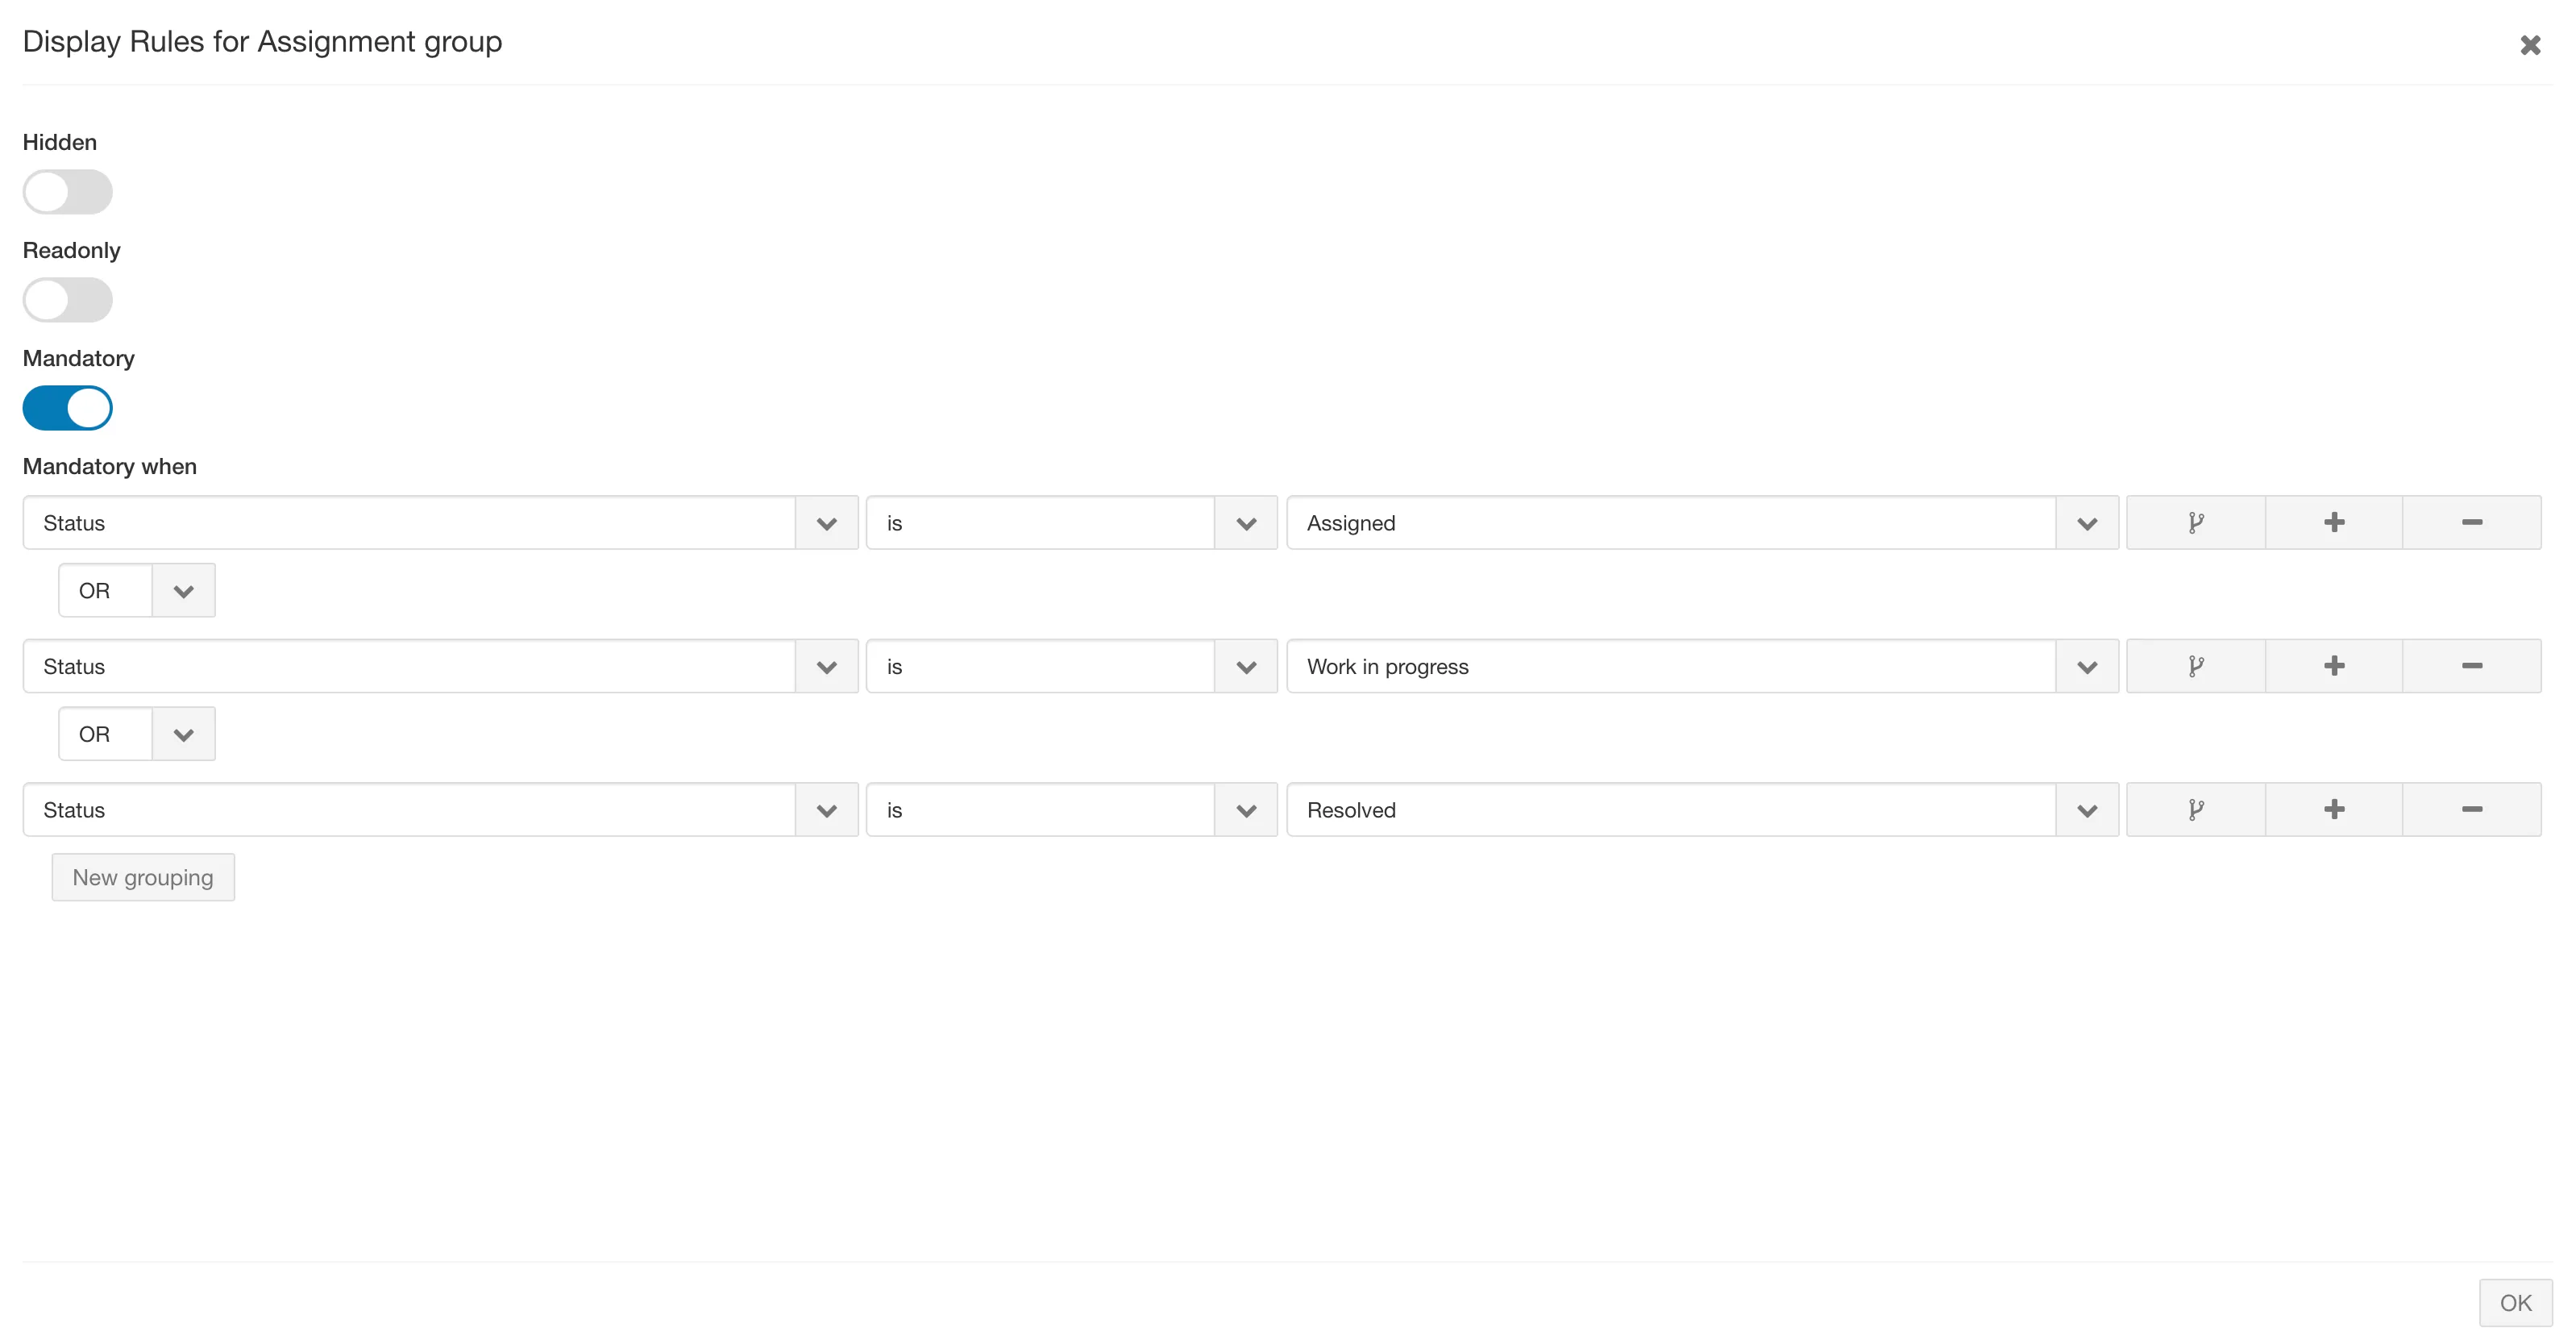
Adding Display Rules to the Details Component
Section titled “Adding Display Rules to the Details Component”To apply display rules that will make slots hidden, mandatory, or read-only, click the tile icon in the upper right-hand corner of the details canvas.
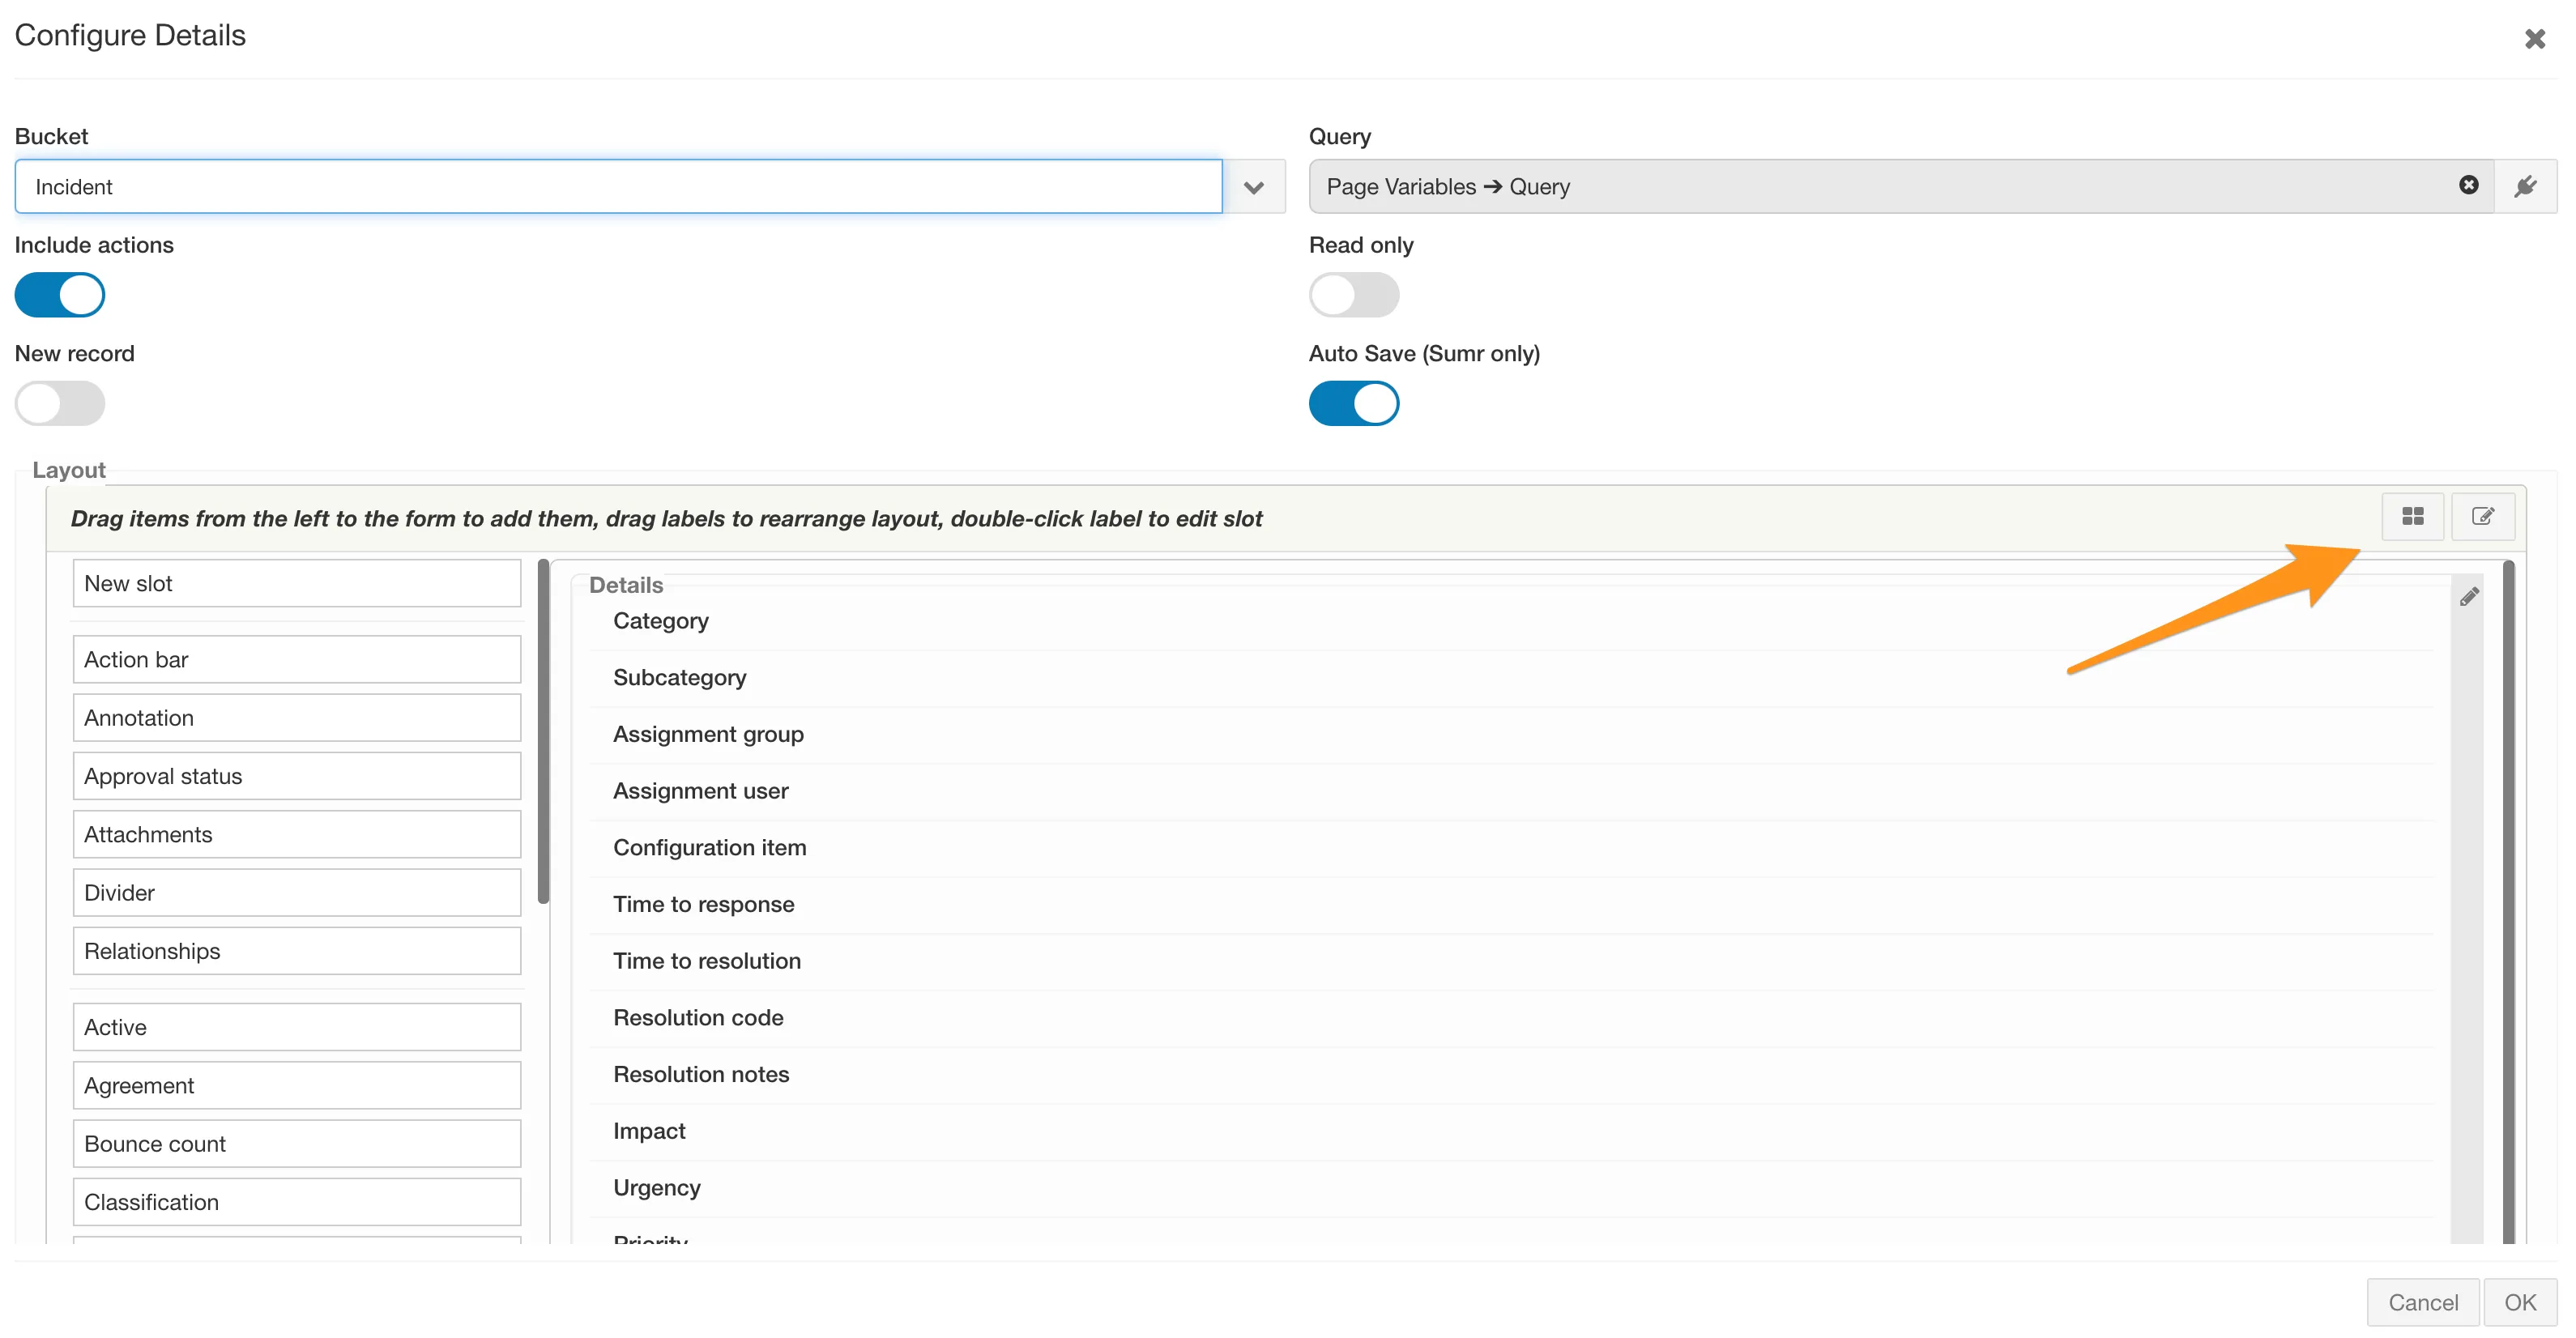
This will open the display rules screen, where a list of slots; slots with an active rule will have a checkmark next to them. To add or change a display rule, check the box next to the desired slot and then toggle the type of rule to be set.
Overview
Section titled “Overview”The starting point for navigating the F8 UI. Pages have a layout that’s made up of containers. The layouts are customizable and one can add as many containers as necessary. Page Components (the data display mechanism on the UI) are rendered in the container.
Actions
Section titled “Actions”Overview
Section titled “Overview”Actions are used to run logic against records, interfaces, or users in the system. This logic can include any number of sequenced activities combined to make the system behave as required by the bundle.
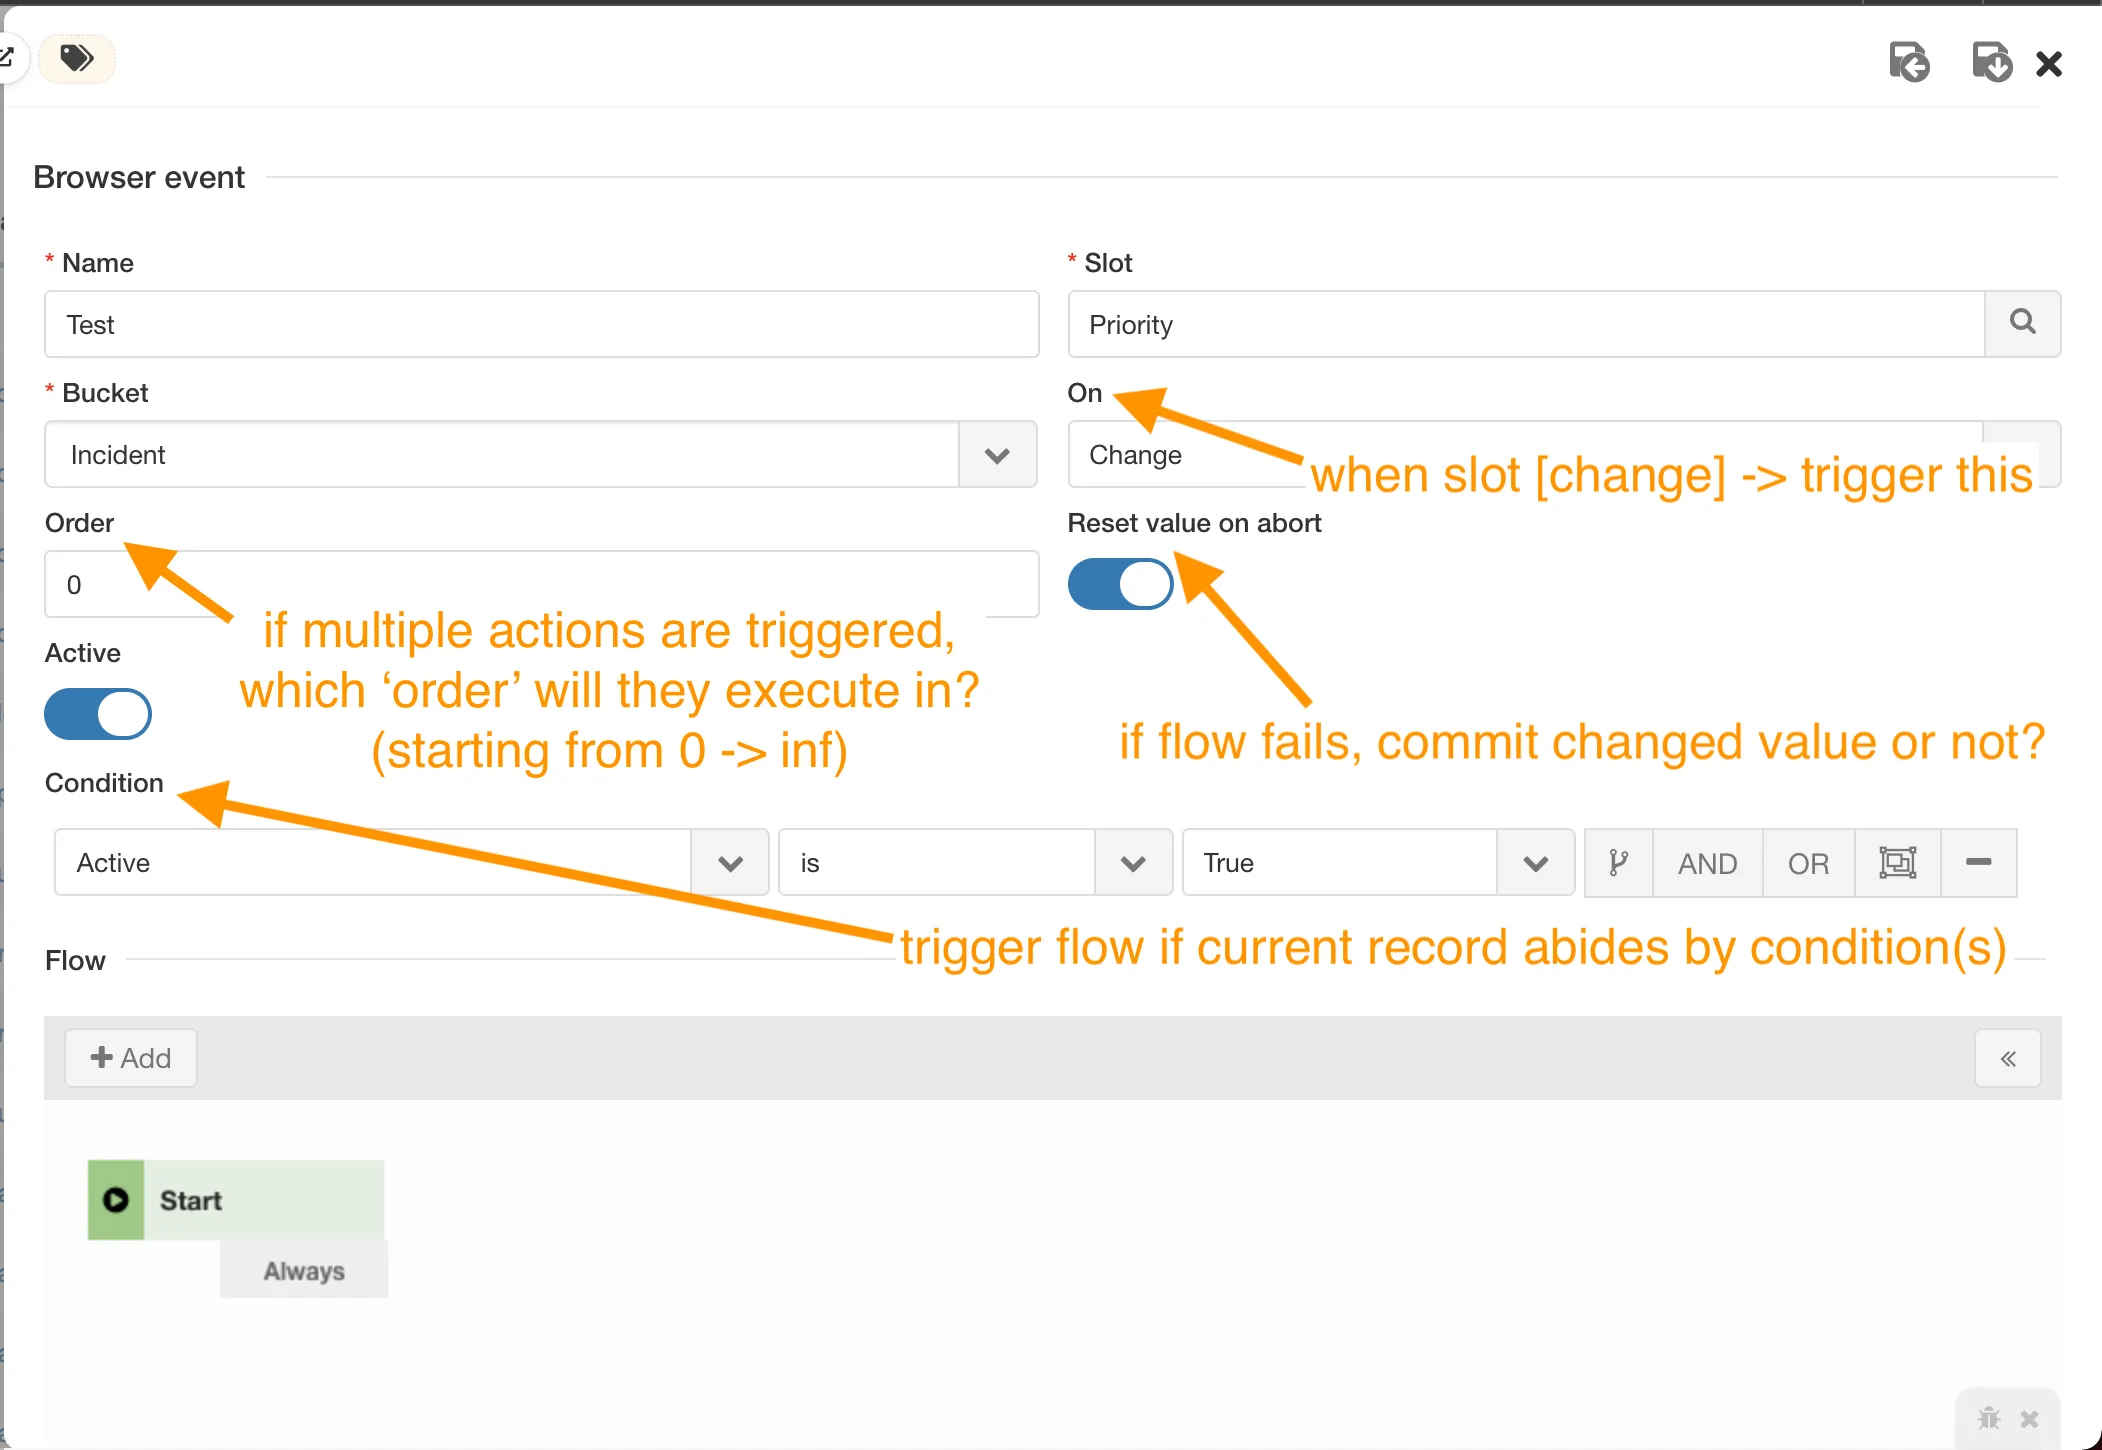
Browser Event
Section titled “Browser Event”A browser event triggers a flow (a tool used to help make new features and tools) on a specified slot change. To create a browser event, navigate to Bundle of Your Choice -> Bundle Configuration -> Bucket Management -> Actions. Add a new record and then select Browser Event.
Browser Actions
Section titled “Browser Actions”Browser actions initiate a client-side workflow that can be launched from either a button click or by pressing a specific key combination (keystroke). Some examples are:
-
New
-
Create Problem
-
Convert Intake
-
Export
Documentation Action
Section titled “Documentation Action”Documentation actions are used in any component that uses markdown. This action will create a text link in the markdown that will run the flow designed in the action.
Notification Action
Section titled “Notification Action”Notification actions give the ability to send an email when a condition is met. The email can be sent to groups of users or to specific slots. They can also be sent when a “speak” is sent or created. The person receiving the email will get an email stating that they have an unread speak on a specific record number.
Tree Action
Section titled “Tree Action”Tree actions are used on the tree component. They provide the ability to update and inserts records using a folder or file system structure.
Triggers
Section titled “Triggers”Triggers are server-side workflows that are initiated by a change in value on a record.
User Management and Security
Section titled “User Management and Security”Overview
Section titled “Overview”The system bundle contains a User management section where users can be added, managed, and deleted; groups can be configured here as well. Note: Dreamtsoft is a default deny system.
Changing Display Rules
Section titled “Changing Display Rules”Display rules can be changed from a details component; these rules are used to select the option to set a slot to hidden, read-only, or mandatory status. This can be done on an already created page or when a page is in the process of being created. In order to open the window to set the display rules, click on the pencil icon on the left side of the screen, then click on Details. On the page that opens, click on the four squares icon to open the display rules settings.